Preparing the Glassware
Before using any glassware for a volumetric analysis, it is essential that the glassware be clean.
Test for the cleanliness of glassware by adding distilled water to it, then allowing the water to drain out.
If the glassware is clean, the water will leave an unbroken film.
If the glassware is dirty, the water will form droplets and the thin film will have crinkly edges.
Dirty glassware will need to be cleaned using a suitable detergent and water before it can be used for volumetric analysis.
Only clean glassware should be used for volumetric analysis.
Before being used for volumetric analysis, the clean glassware is then prepared by rinsing with a suitable solution.
| Glassware |
Use |
Rinsed with |
Reason |
|---|
| beaker |
To store solution from the volumetric flask, preventing contamination of solution in volumetric flask. |
Solution to be used. |
Rinsing with solvent, eg water, would dilute the solution so its concentration would no longer be known accurately.
Rinsing with solution to be used ensures removal of any moisture adhering to glass. |
|---|
| pipette |
To deliver an accurate volume (aliquot) of solution from the beaker. |
Solution to be used. |
Rinsing with solvent, eg water, would dilute the solution so its concentration would no longer be known accurately.
Rinsing with solution to be used ensures removal of any moisture adhering to glass. |
|---|
| burette (buret) |
To deliver an accurate volume (titre) of solution. |
Solution to be used. |
Rinsing with solvent, eg water, would dilute the solution so its concentration would no longer be known accurately.
Rinsing with solution to be used ensures removal of any moisture adhering to glass. |
|---|
conical flask
(erlenmeyer flask) |
To contain the reaction mixture. |
Solvent (eg, water) |
Rinsing with the solution to be added from the pipette would increase the moles of substance used in the reaction, so the titre volume would be greater than it should be.
Rinsing with the solution from the burette (buret) would cause some of the titrant to react before the volume of the titre is recorded so the value of the titre would be less than it should be.
|
|---|
Preparing the burette (buret):
 Once the burette (buret) has been rinsed, insert the glass funnel into the burette (buret) leaving an air gap between the neck of the funnel and the sides of the burette (buret).
With the burette's (buret's) stopcock in the closed position, pour some solution in to the funnel and allow it to drain down into the burette (buret) until the volume of solution is well above the 0.00 mL mark etched onto the side of the burette (buret).
Remove the funnel.
Position the burette (buret) over a waste receptacle such as a beaker, or the sink.
Gently, partially open the burette's (buret's) stopcock and allow some of the solution to flow through slowly, until the bottom of the meniscus sits exactly on the 0.00 mL graduation mark etched on the side of the burette (buret) when viewed at eye level, and close the stopcock.
Discard the solution collected in the waste receptacle appropriately.
Preparing the conical (erlenmeyer) flask:
Use an aspirette (pipette filler or bulb) attached to the clean, rinsed pipette to draw up a volume of solution from the beaker to a point above the calibration mark etched on the pipette.
Position the pipette over a waste receptacle such as another beaker or the sink.
Very slowly and carefully, allow solution to escape from the pipette drop by drop until the bottom of the meniscus sits exactly on the calibration mark when viewed at eye level.
(Discard the solution in the waste receptacle appropriately.)
Position the pipette containing the solution within the confines of the clean, rinsed conical flask, touching an internal wall of the flask at an angle.
Allow the solution to run freely through the pipette.
When the solution is no longer flowing, that is, the meniscus comes to rest, remove the pipette from the conical flask.
DO NOT attempt to remove the small amount of solution still in the pipette, the pipette has been calibrated to take this small amount of solution into account.
If required, a drop of indicator could now be added to the solution in the conical (erlenmeyer) flask.
The conical flask with its solution is now placed under the burette (buret) containing its solution. It is best to position the burette (buret) within the confines of the neck of the conical (erlenmeyer) flask to ensure all the drops of solution from the solution go straight down into the flask.
The next step is to conduct the titration.
Performing the Titration
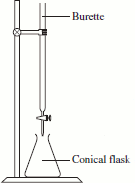 The equipment that will be used for each titration should now be set up as shown in the diagram on the right.
It is usual to place a white tile, or even a piece of white paper, under the conical flask so that it is easier to see any colour changes that occur in the conical (erlenmeyer) flask.
It is also good practice to position your burette (buret) against a contrasting background so that the bottom of the meniscus is easier to read.
This can be done by holding a piece of paper behind the burette (buret) whenever you take a reading, or, by cutting 2 parallel slits, a few centimetres apart, in a piece of plain paper (or filter paper) and sliding this over the burette (buret) so that it can slide up and down the burette (buret) giving you a contrasting background wherever you need it.
Perform a Rough Titration First
Perform a rough titration using this apparatus to get an idea of how much solution must be added.
- Record the intial volume of solution in the burette (buret)
(if this is the first titration, the volume should be 0.00 mL)
- Open the burette's (buret's) stopcock and allow solution to run down into the conical (erlenmeyer) flask while you swirl the conical flask.
- Close the stopcock as soon as the reaction reaches its equivalence point
(when an indicator changes colour this is called the end point and should be at the same point as the equivalence point of the reaction.)
- Record the final volume as shown on the burette (buret).
Remember to read the volume at eye level and from the bottom of the meniscus.
- Subtract the first volume reading from this new volume to give you the amount of solution that has been added to the conical (erlenmeyer) flask.
titre = volume of solution added from burette (buret) to conical flask
titre = final burette (buret) reading - initial burette (buret) reading
NOTE: this titre will NOT be used in any calculations. This titre is ONLY to establish a rough location of the end point for the titration.
- Discard the solution in the conical flask appropriately.
- Wash the flask and rinse it with solvent (probably distilled water) before using the pipette to add another aliquot of solution to the flask, and another drop of indicator if required.
You may also need to refill the burette (buret) to the 0.00 mL mark if you have used more than half the volume of the burette (buret).
|

|
Perform a careful titration using your rough titration above as a guide.
Your equipment should be set up once again as shown in the diagram.
- Record the initial volume of solution in the burette (buret).
- Swirl the conical flask while adding solution from the burette (buret) until you are close to, say within 80% of, the expected end point based on the rough titration, then close the stopcock.
You don't want to overshoot the end point, so don't try to get too close on this first careful titration.
- Partially open the stockcock so that solution falls drop by drop into the conical flask.
Continue swirling the flask.
- When you are very close to the end point, a drop of solution from the burette (buret) will change the colour of the solution, but when you swirl the flask, this colour will disappear.
At this point, close the stopcock, and then only open the stopcock enough to allow one drop at a time to fall from the burette (buret).
- The end point of the titration has been reached when 1 drop changes the colour of the solution in the conical flask, and, swirling the flask does not cause this colour to disappear.
(Referred to as a "permanent colour change")
Record the final volume as shown on the burette (buret).
- Calculate the titre (the volume of solution added to the conical flask from the burette (buret)):
titre = final burette (buret) reading - initial burette (buret) reading
- Clean and rinse your conical (erlenmeyer) flask, add another aliquot of solution and indicator, refill the burette (buret) if required, then repeat this titration.
|
|
You will need to repeat the titration until you have three titres that are very close to each other.
That is, you will need to have three titres with volumes within 0.05 mL of each other.
Titres that are within 0.05 mL of each other are said to be concordant titres.
If you have a titre that is not close to the other titres, record it, BUT ignore it! This titre will NOT be used in any calculations.
When you have three concordant titres, these are averaged to give the average titre:
| average titre = |
titre 1 + titre 2 + titre 3
3 |
The average titre is then used to calculate the concentration of the titrate (see Titration Calculations Tutorial).
1. Volumetric flasks are usually calibrated to contain an accurate volume of water at the temperature specified on the glassware. It is assumed that you will be using dilute aqueous solutions so that you can assume the volume of the solution would be the same as the volume of water.